-
Session 1 - Revision of Python Programming
-
-
- Join this Course to access resources
-
- Join this Course to access resources
-
Session 2 - Activity - Restaurant food Order System
-
-
- Join this Course to access resources
-
Session 3 - Introduction to Microbit and MakeCode Platform
-
-
- Join this Course to access resources
-
Session 4 - Python Program of Temperature Conversion.
-
-
- Join this Course to access resources
-
Session 5 - Introduction to Temperature Sensor in Microbit
-
-
- Join this Course to access resources
-
Session 6 - Using Two Microbits to Monitor Outdoor Temperatures Remotely
-
-
- Join this Course to access resources
-
Session 7 - Introduction to Microcontrollers and Actuators on Tinkercad
-
Session 8 & 9 - Theft Detection System (Using Arduino + PIR)
-
Session 10 & 11- Plant Watering Using Microbit
- Session 12
- Session 13
- Session 14
- Session 15
- Session 16
-
Session 17 to 20 - Home Automation using Artificial Intelligence and Text to Speech
-
-
- Join this Course to access resources
-
- Join this Course to access resources
Session8 & 9.pptx (Lecture Slide)
Theft Detection System (Using Arduino + PIR)
“Technology doesn’t sleep — that’s why it’s perfect for guarding what matters.”
💡 Introduction
introducing the concept of a Passive Infrared (PIR) sensor, how it detects motion, and how to interface it with an Arduino board to form the base of a theft detection system.
- PIR stands for Passive Infrared Sensor.
- It detects infrared (heat) radiation emitted by moving objects (like humans or animals).
- It has a range of 6 to 10 meters.
- Commonly used in security systems, automatic lights, and intruder alarms.
📘 Pre-requisite Knowledge
- Basic knowledge of Arduino board and its pins.
- Understanding of how to connect components like sensors and LEDs.
- Familiarity with the PIR (Passive Infrared) sensor and its function.
- Simple C++ coding or block based code for Arduino (e.g., pinMode(), digitalRead(), digitalWrite()).
- Use of if-else conditions in Arduino code.
- How to upload and run a sketch using Tinkercad simulator.
🎯 Learning Objectives
- Understand the working principle of a PIR (Passive Infrared) sensor.
- Connect a PIR sensor to an Arduino board correctly.
- Trigger an output device (like a buzzer or LED) on motion detection by writing code for Arduino.
- Simulate and test the theft detection system in Tinkercad.
🛠 Tools & Materials Required
- Hardware: Laptop / Desktop, Arduino Uno, PIR Sensor, Buzzer, Wires.
- Software: Tinkercad.
- Others: Internet connection.
Activity - Theft Alarm
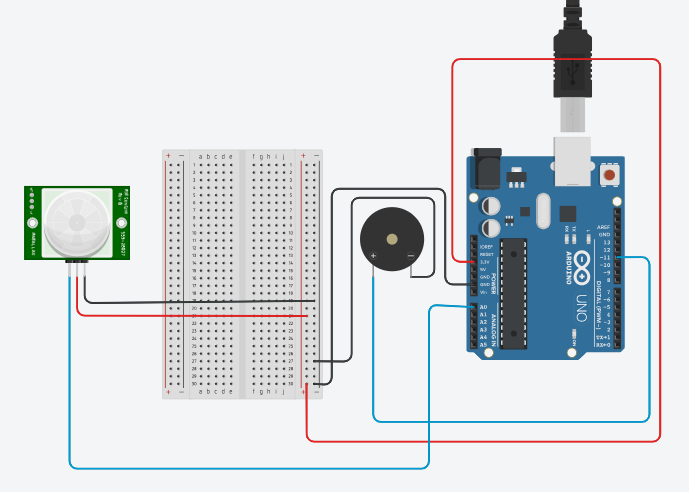
Step 1. Connect the circuit as given below.
PIR Sensor Pin |
Connect To |
|
VCC |
3V on Arduino |
|
GND |
GND on Arduino |
|
OUT |
Analog Pin A0 |
Buzzer Pin |
Connect To |
|
Positive Terminal |
D11 on Arduino |
|
Negative Terminal |
GND on Arduino |
Step 2. Do the Following Code in Blocks or in C++.
OR
Step 3. Click on Start Simulation at top right side.
Activity: https://www.tinkercad.com/things/lLMeAMQdLtX-theft-alarm-system
🧩 Expected Outcome
🔍 Observation
- Connection of PIR Sensor to the Arduino board.
- Simulation of the project with PIR sensor.
- Connection of Piezo Buzzer to Arduino Board.
- Doing and understanding the Block Code.
Rating
0
0
There are no comments for now.
Join this Course
to be the first to leave a comment.
